Computers and Technology, 15.12.2020 01:00 elenagarcia123
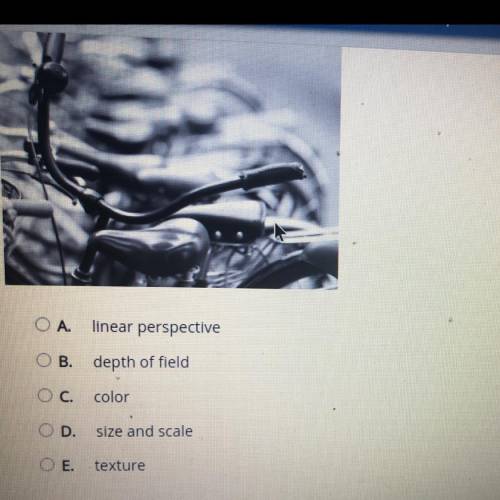
Janet composed a poster with this image which technique did Janet use to create depth in this image?
A. Linear Perspective
B. Depth of field
C. Color
D. Size and scale
E. Texture

Answers: 1
Another question on Computers and Technology
Computers and Technology, 22.06.2019 19:20
Consider the following code snippet: #ifndef cashregister_h#define cashregister_hconst double max_balance = 6000000.0; class cashregister{public: cashregister(); cashregister(double new_balance); void set_balance(double new_balance); double get_balance() const; private: double balance[12]; }; double get_monthly_balance(cashregister bk, int month); #endifwhich of the following is correct? a)the header file is correct as given.b)the definition of max_balance should be removed since header files should not contain constants.c)the definition of cashregister should be removed since header files should not contain class definitions.d)the body of the get_monthly_balance function should be added to the header file.
Answers: 1
Computers and Technology, 24.06.2019 17:50
Create a class hand in its own module. one object of class hand represents a hand of cards and so one object stores a number of card objects. for this assignment you will submit three separate modules, one with the definition of class card, one with the definition of class hand and one with the main application that thoroughly tests class hand.class hand must contain the following four methods: 1) , numcardsinhand) takes an integer as parameter and initializes a hand object with numcardsinhand card objects inside it. these card objects are generated randomly. for simplicity, assume an infinite number of decks of cards.2) bjvalue(self) returns the blackjack value for the whole hand of cards3) ) returns a string containing all the cards in the hand4) hitme(self) adds one randomly generated card to the handcreate a main program in its own module that thoroughly tests class hand. you will have three modules/files to upload to your etudes assignment submission: card.py, hand.py and the module that contains your main program.two alternatives for extra credit - you cannot get credit for both! (+1 point): after you have thoroughly tested the class hand and all of its methods, add code to your main program that stores one hand object as a pickle file and reads it back into a new hand object. you are only eligible for this extra credit if class hand has all four of the methods above working.or(+2 points): after you have thoroughly tested the class hand and all of its methods, add code to your main program that stores one hand object as a text file on the disk and reads it back into a new hand object. you are only eligible for this extra credit if class hand has all four of the methods above working.notes: -start by making any and all modifications suggested by my comments to your previous submission of class card from assignment #6 "a robust card object"-once your class card is tested and working well, you will not make any further modifications to it for the purposes of class hand.-you can keep the test code for class card intact. if it is indented inside an if __name__ == "__main__", then it will not be executed when your main program's module imports it.-to save time, write and test one method for class hand at a time.-under no circumstances are you to attempt the extra credit until you are completely finished with writing and testing all the methods in class hand.
Answers: 3
Computers and Technology, 25.06.2019 20:20
Ineed under standing an assignment, i've contacted my teacher but i want to finish this class already. here's the directions: your first direction for this assignment is to read the previous assignment again; but for this assignment, you will enlist the of a friend for the environmental portrait. apply what you learned from assignment 5. apply all of the techniques and the feedback you received. the last assignment: for this assignment you will need to enlist the of a family member for an environmental portrait. this could be a parent or guardian, an older brother or sister, etc. although this won't be painful for your subject, it will take a bit of time. the first step is to select an appropriate spot to take the photographs. do not take the photographs inside. find a comfortable, shady spot outside where your subject won't have to squint. this could be a covered patio, a ramada in a local park, under a large tree with plenty of shade, a porch, etc. if you choose the "under the tree" option, make sure no direct sunlight is on your subject. your subject can be seated or standing. the scene should be relatively clutter free, but with enough supporting details to give an idea of where the subject is. remember to orient the camera in either portrait or landscape mode as appropriate for the composition. make sure you have your focus and exposure set on your subject. to do this, put your subject in the center of the frame (this is where your primary focus point is and where the camera gets most of its exposure information) and use the half-push technique. this will lock the focus and exposure for your subject. if you need to recompose the photograph you can, but you have to keep the shutter button half pushed. you will have to do this for each image you take. take a number of photographs of your subject capturing different facial expressions, etc. make all of the photographs in one session and at one location. it is very difficult to recapture the feeling of a session if it is interrupted. important tip: in the first frame of your session, have your subject hold a piece of white paper so you can see it fully in the camera. you will use this later to judge the color balance. after taking your photographs load them into your computer and look at all the images you took. select three of your photos. one image will be the photograph of your subject holding the sheet of white paper. the other two will be different images of your subject. first, scale the "white paper" image to 800 pixels wide by 600 pixels high using the "scale image" tool in gimp. sharpen the image as appropriate. examine the image of your subject holding the white piece of paper closely. does the paper look white or very light gray? or does it have the tinge of a color in it? if it has the tinge of a color, open the color balance tool and adjust the colors so the paper looks white or light gray. let's say you took the photographs under a tree. the images may have a slightly greenish tone to them. you might have to adjust the green / magenta channel. whatever adjustments you have to make, write them down. you will have to apply them to the other two images.
Answers: 1
Computers and Technology, 25.06.2019 22:30
If you were working on a mainframe, which of the following operating systems would you most likely be using? linuxmacintoshmicrosoft windowsunix
Answers: 1
You know the right answer?
Janet composed a poster with this image which technique did Janet use to create depth in this image?...
Questions

Social Studies, 11.09.2020 19:01

Mathematics, 11.09.2020 19:01
Mathematics, 11.09.2020 19:01
Mathematics, 11.09.2020 19:01
Mathematics, 11.09.2020 19:01
Mathematics, 11.09.2020 19:01
Mathematics, 11.09.2020 19:01
Mathematics, 11.09.2020 19:01
Mathematics, 11.09.2020 19:01
Mathematics, 11.09.2020 19:01

English, 11.09.2020 19:01
Mathematics, 11.09.2020 19:01
Mathematics, 11.09.2020 19:01
Mathematics, 11.09.2020 19:01
English, 11.09.2020 19:01
Mathematics, 11.09.2020 19:01
Mathematics, 11.09.2020 19:01
Mathematics, 11.09.2020 19:01
Mathematics, 11.09.2020 19:01
Mathematics, 11.09.2020 19:01